| 3.DataGridView でのセルに関する操作関係色々(18_DGV_03) (旧、SampleNo.309) |
| 下記プログラムコードに関する補足・注意事項 動作確認:Windows 8.1 (Windows 7) / VB2013 (VB2010) / Framework 4.5.1 / 対象の CPU:x86 Option :[Compare Text] [Explicit On] [Infer On] [Strict On] Imports :追加なし 参照設定:WaitTime.dll 参照設定方法参照 その他 :使用データは、次よりダウンロードして使って下さい。 dgvdat.zip :このサンプルを使用される前に、左のメニューのDataGridViewでのデータの読込保存関係をご覧になって下さい。 このサンプル等の内容を無断で転載、掲載、配布する事はお断りします。(私の修正・改訂・削除等が及ばなくなるので) 必要ならリンクをはるようにして下さい。(引用の場合は引用元のリンクを明記して下さい) |
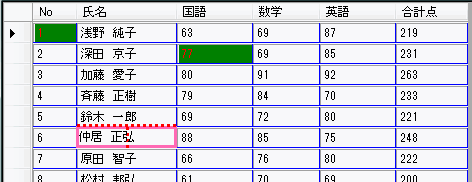
Private Sub Button3_Click(sender As Object, e As EventArgs) Handles Button3.Click '01.アクティブセル又は、指定のセルの前景色と背景色を変更する If DataGridView1.Rows.Count = 0 Then Button1.PerformClick() End If If DataGridView1.DefaultCellStyle.SelectionForeColor = SystemColors.HighlightText Then 'セルが選択された時の前景色を変更する DataGridView1.DefaultCellStyle.SelectionForeColor = Color.Red 'セルが選択された時の背景色を変更する DataGridView1.DefaultCellStyle.SelectionBackColor = Color.Green Else 'セルが選択された時の前景色を元に戻す DataGridView1.DefaultCellStyle.SelectionForeColor = SystemColors.HighlightText 'セルが選択された時の背景色を元に戻す DataGridView1.DefaultCellStyle.SelectionBackColor = SystemColors.Highlight End If '指定のセルの前景色と背景色を変更する '3列目の2行目のセルの背景色と前景色を変更する Debug.Print(DataGridView1(2, 1).Style.BackColor.ToString) If DataGridView1(2, 1).Style.ForeColor = Color.Empty Then DataGridView1(2, 1).Style.ForeColor = Color.White DataGridView1(2, 1).Style.BackColor = Color.Red Else DataGridView1(2, 1).Style.ForeColor = Color.Empty DataGridView1(2, 1).Style.BackColor = Color.Empty End If End Sub 上記実行結果は下記、図1.参照 |
Private frg2 As Boolean Private Sub Button4_Click(sender As Object, e As EventArgs) Handles Button4.Click '02.セルの境界線スタイル/カラーを設定 及び 指定のセルのみに罫線を描画する If DataGridView1.Rows.Count = 0 Then Button1.PerformClick() End If If DataGridView1.GridColor = SystemColors.ControlDark Then 'セルを区切るグリッド線の色を設定 DataGridView1.GridColor = Color.Blue 'セル境界線スタイルを一重線の境界線に設定 DataGridView1.CellBorderStyle = DataGridViewCellBorderStyle.Single 'セルの上側の境界線スタイルを二重線のくぼんだ境界線に設定 DataGridView1.AdvancedCellBorderStyle.Top = DataGridViewAdvancedCellBorderStyle.InsetDouble 'セルの左側の境界線スタイルを二重線の浮き出した境界線に設定 DataGridView1.AdvancedCellBorderStyle.Left = DataGridViewAdvancedCellBorderStyle.OutsetDouble Else '上記設定を元に戻す DataGridView1.GridColor = SystemColors.ControlDark DataGridView1.AdvancedCellBorderStyle.Top = DataGridViewAdvancedCellBorderStyle.None DataGridView1.AdvancedCellBorderStyle.Left = DataGridViewAdvancedCellBorderStyle.None End If '指定のセルのみに罫線を描画する場合 'CellPainting イベント内で個別に描画する必要があります。 frg2 = Not frg2 '表示/非表示の切り替え DataGridView1.Refresh() '再描画 '※ コードは、DataGridView1_CellPainting イベント内に記入してあります。 End Sub Private Sub DataGridView1_CellPainting(sender As Object, _ e As DataGridViewCellPaintingEventArgs) Handles DataGridView1.CellPainting '6行目の2列目のセルの罫線を描画する場合 If frg2 = True And e.RowIndex = 5 And e.ColumnIndex = 1 Then Dim flgStyle As TextFormatFlags '描画する範囲を設定(下側の線が細くなるので描画位置を Height - 2) Dim newRect As New Rectangle(e.CellBounds.X, e.CellBounds.Y, _ e.CellBounds.Width - 2, e.CellBounds.Height - 2) 'セルの内部を塗りつぶしす e.Graphics.FillRectangle(New SolidBrush(e.CellStyle.BackColor), e.CellBounds) 'セルを描画する(線の太さを3ピクセルで) e.Graphics.DrawRectangle(New Pen(New SolidBrush(Color.HotPink), 3), newRect) 'セルの中央部分に線を表示(このように位置さえ指定すればどこでも描画が可能) Using BPen1 As New Pen(Color.Red, 3) BPen1.DashStyle = Drawing2D.DashStyle.Dot '線種を点線に 'セルの上側の線の位置を求める(解りやすいように -2 ピクセルずらしている) Dim pt1 As New Point(e.CellBounds.X, e.CellBounds.Y - 2) Dim pt2 As New Point(e.CellBounds.X + e.CellBounds.Width, e.CellBounds.Y - 2) 'セルの中央の位置を求める(上側と下側) Dim pt3 As New Point(e.CellBounds.X + (e.CellBounds.Width \ 2), e.CellBounds.Y) Dim pt4 As New Point(e.CellBounds.X + (e.CellBounds.Width \ 2), e.CellBounds.Y + e.CellBounds.Height) e.Graphics.DrawLine(BPen1, pt3, pt4) 'セルの中央に線を描画 e.Graphics.DrawLine(BPen1, pt1, pt2) 'セルの上側に線を描画 End Using If (e.Value IsNot Nothing) Then 'セルデータの表示位置を列個別に設定(本来は指定のセル分だけでよい) Select Case e.ColumnIndex Case 0, 2, 3, 4, 5 flgStyle = TextFormatFlags.VerticalCenter Or TextFormatFlags.Right Case 1 flgStyle = TextFormatFlags.VerticalCenter Or TextFormatFlags.Left End Select TextRenderer.DrawText(e.Graphics, CStr(e.Value), _ e.CellStyle.Font, e.CellBounds, e.CellStyle.ForeColor, flgStyle) End If '処理の完了を通知 e.Handled = True End If 'DataGridView のフォーカス枠を好みに合わせて描画する 'ヘッダーセルの部分の描画を除外する If frg6 = True And e.ColumnIndex >= 0 AndAlso e.RowIndex >= 0 AndAlso (e.PaintParts And _ DataGridViewPaintParts.Background) = DataGridViewPaintParts.Background Then 'セルが選択されている場合の描画方法 If (e.PaintParts And DataGridViewPaintParts.SelectionBackground) = _ DataGridViewPaintParts.SelectionBackground AndAlso _ (e.State And DataGridViewElementStates.Selected) = DataGridViewElementStates.Selected Then '下記は起動時の設定の>部分にでも書いておいて下さい(このままでもOKです) '選択箇所の文字色をデフォルトの白から青に変更 'DataGridView1.DefaultCellStyle.SelectionForeColor = Color.Blue '選択箇所の文字色をデフォルトの白から青に変更 Dim dgv As DataGridView = CType(sender, DataGridView) dgv.DefaultCellStyle.SelectionForeColor = Color.Blue '描画する範囲を設定(下側の線が細くなるので描画位置を Height - 2) Dim newRect As New Rectangle(e.CellBounds.X, e.CellBounds.Y, _ e.CellBounds.Width - 2, e.CellBounds.Height - 2) 'ラインの色・ラインの太さを設定 Dim BPen As New Pen(Color.Blue, 2) '線種を設定 BPen.DashStyle = Drawing2D.DashStyle.Dash '上記の>条件でセルに罫線を描画する e.Graphics.DrawRectangle(BPen, newRect) BPen.Dispose() 'セルの背景の描画設定 Dim pParts As DataGridViewPaintParts = e.PaintParts And Not DataGridViewPaintParts.Background 'セルを描画する e.Paint(e.ClipBounds, pParts) '処理の完了を通知 e.Handled = True End If End If End Sub 図1.上記サンプル No1. と No2. の実行結果  |
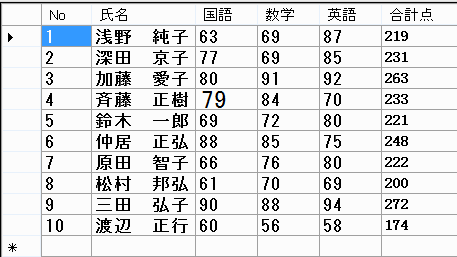
Private Sub Button5_Click(sender As Object, e As EventArgs) Handles Button5.Click '03.セルに書式設定をして表示 If DataGridView1.Rows.Count = 0 Then Button1.PerformClick() End If Dim cstyle1, cstyle2, cstyle3, cstyle4, cstyle5 As New DataGridViewCellStyle cstyle1.Alignment = DataGridViewContentAlignment.MiddleRight cstyle1.Format = "0000" '前方に00を付けて表示する場合 0000123 DataGridView1.Columns(0).DefaultCellStyle = cstyle1 cstyle2.Alignment = DataGridViewContentAlignment.MiddleCenter DataGridView1.Columns(1).DefaultCellStyle = cstyle2 cstyle3.Format = "N1" '下1桁で0揃え N2 :下2桁 (小数点を表示する場合) DataGridView1.Columns(2).DefaultCellStyle = cstyle3 cstyle4.Alignment = DataGridViewContentAlignment.MiddleRight cstyle4.Format = "#,###.0" '3桁区切りスタイルの場合 DataGridView1.Columns(3).DefaultCellStyle = cstyle4 cstyle5.Format = "合計点= ### 点" '文書を付けて表示する場合 合計点は= 267 点 cstyle5.Font = New Font("MS ゴシック", 9, FontStyle.Regular) DataGridView1.Columns(5).DefaultCellStyle = cstyle5 '書式指定文字は、下記で調べて下さい。 'http://msdn.microsoft.com/ja-jp/library/dwhawy9k.aspx End Sub 図2.上記実行結果  |
Private Sub Button6_Click(sender As Object, e As EventArgs) Handles Button6.Click '04.セルにフォントを設定 If DataGridView1.Rows.Count = 0 Then Button1.PerformClick() End If If DataGridView1.DefaultCellStyle.Font.Name = "MS UI Gothic" Then '全て変更 DataGridView1.DefaultCellStyle.Font = New Font("MS ゴシック", 10, FontStyle.Bold) 'セル個別に変更 DataGridView1.Item(2, 3).Style.Font = New Font("MS UI Gothic", 15, FontStyle.Regular) '特定の列だけ変更する場合 Dim cstyle As New DataGridViewCellStyle 'すでに、設定されている分を引き継ぐ場合 cstyle = DataGridView1.Columns("英語").DefaultCellStyle cstyle.Font = New Font("MS P明朝", 12, FontStyle.Bold) DataGridView1.Columns("英語").DefaultCellStyle = cstyle Else '下記では、セル個別に変更した分は元に戻りません DataGridView1.DefaultCellStyle = Nothing '又は、 DataGridView1.DefaultCellStyle.Font = New Font("MS UI Gothic", 9, FontStyle.Regular) '個別に元に戻す必要がある DataGridView1.Item(2, 3).Style = Nothing 'DataGridView1.Columns("英語").DefaultCellStyle = Nothing End If End Sub 図3.上記実行結果  |
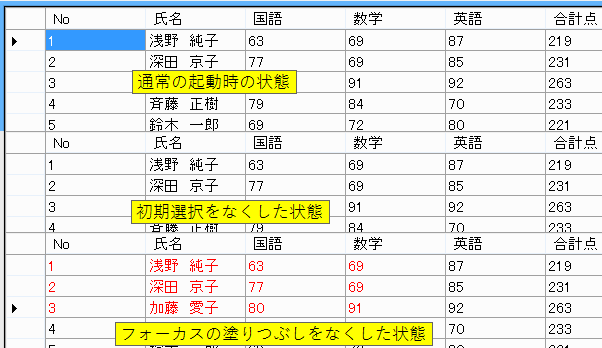
Private frg5 As Boolean Private Sub Button7_Click(sender As Object, e As EventArgs) Handles Button7.Click '05.初期表示時に選択セルをなくす及びフォーカスの塗りつぶしを解除する Button1.PerformClick() frg5 = Not frg5 If frg5 Then '初期表示時に選択されているセルをなくす(必要な個所で下記コードを実行) DataGridView1.CurrentCell = Nothing 'フォーカスの塗りつぶし解除する(アクティブセルのカラーを変更すると同じ事) If DataGridView1.DefaultCellStyle.SelectionForeColor = SystemColors.HighlightText Then 'セルが選択された時の前景色(文字色)を変更する DataGridView1.DefaultCellStyle.SelectionForeColor = Color.Red 'セルが選択された時の背景色を変更する DataGridView1.DefaultCellStyle.SelectionBackColor = Color.White Else 'セルが選択された時の前景色(文字色)を元に戻す DataGridView1.DefaultCellStyle.SelectionForeColor = SystemColors.HighlightText 'セルが選択された時の背景色を元に戻す DataGridView1.DefaultCellStyle.SelectionBackColor = SystemColors.Highlight End If End If End Sub 図4.上記実行結果  |
Private frg6 As Boolean Private Sub Button8_Click(sender As Object, e As EventArgs) Handles Button8.Click '06.DataGridView のフォーカス枠を好みに合わせて描画する frg6 = Not frg6 Button1.PerformClick() 'コードは、DataGridView1_CellPainting イベント内に記入してあります。 End Sub 図4.上記実行結果  フォーカス枠の線種・線の太さ・カラー等はお好みで設定して下さい。 |
Private Sub Button9_Click(sender As Object, e As EventArgs) Handles Button9.Click '07.指定のセルを選択・編集・選択解除設定色々 If DataGridView1.Rows.Count = 0 Then Button1.PerformClick() End If '指定のセルを選択する(2列目の6行目を選択する) DataGridView1.Item(1, 5).Selected = True MessageBox.Show("指定のセル(1,5)を選択しました。") MessageBox.Show("指定のセル(2,3)を編集モードにします。") '指定のセルをアクティブに設定する DataGridView1.CurrentCell = DataGridView1.Item(2, 3) 'アクティブセルを編集モードにする DataGridView1.BeginEdit(False) wt.WaitTime(2000) 'アクティブセルをなくす場合 DataGridView1.CurrentCell = Nothing '全てのセルを選択 DataGridView1.SelectAll() MessageBox.Show("全てのセルを選択しました。") '全ての選択を解除します DataGridView1.ClearSelection() MessageBox.Show("全てのセルを選択を解除しました。") End Sub |
Private Sub Button10_Click(sender As Object, e As EventArgs) Handles Button10.Click '08.カレントセル・指定のセル・クリックしたセルの位置・値を取得・書き込み If DataGridView1.Rows.Count = 0 Then Button1.PerformClick() End If DataGridView1.Focus() Dim CelText As String = DataGridView1.CurrentCell.Value.ToString MessageBox.Show(String.Format("アクティブセルの位置は、({0} 行目 の {1} 列目)で値は]{2}です。", _ DataGridView1.CurrentCell.RowIndex, DataGridView1.CurrentCell.ColumnIndex, CelText)) '型が合わないとエラーが発生するので型が解っている場合は必要ありません。 If TypeName(DataGridView1.CurrentCell.Value) = "Integer" Then DataGridView1.CurrentCell.Value = 1234 ElseIf TypeName(DataGridView1.CurrentCell.Value) = "String" Then DataGridView1.CurrentCell.Value = "カレントセルに書き込み" End If '指定のセルの場合(こちらは事前に型がわかっているので) CelText = DataGridView1.Item(1, 5).Value.ToString MessageBox.Show(String.Format("指定のセル(1,5)の値は]、{0} です。", CelText)) DataGridView1.Item(1, 5).Value = "中居まさひろ" End Sub |
Private Sub Button11_Click(sender As Object, e As EventArgs) Handles Button11.Click '09.セルの値が変更された事を知る If DataGridView1.Rows.Count = 0 Then Button1.PerformClick() End If If CellValChang = True Then MessageBox.Show("データが変更されました") End If End Sub 'セルの値が変更された事を知る。 Private CellValChang As Boolean Private Sub DataGridView1_CellValueChanged(sender As Object, e As DataGridViewCellEventArgs) _ Handles DataGridView1.CellValueChanged 'セルの値が変更された場合にこのイベントが発生する。 '表示1のようにバインドされている場合の読み込み時は発生しないが、非結合の場合は発生する '又、行の挿入・削除のような場合も発生しない。確認してから使用の事 '(別途、削除や挿入した場合は、このフラグを True にする等で対応する) 'データの読込後に、False に設定し、保存前等に値を確認する CellValChang = True 'イベントが発生したらフラグを設定する 'MessageBox.Show("データが変更されました") End Sub |
Private frg10 As Boolean Private Sub Button12_Click(sender As Object, e As EventArgs) Handles Button12.Click '10.セルの値によってセルの色等を変更する frg10 = Not frg10 Button1.PerformClick() 'コードは。DataGridView1_CellFormatting イベント内に記入してあります。 End Sub Private Sub DataGridView1_CellFormatting(sender As Object, e As DataGridViewCellFormattingEventArgs _ ) Handles DataGridView1.CellFormatting If frg10 Then 'セルの値によってセルの色等を変更する '(合計点によってセルを色分けしている) Dim dgv As DataGridView = CType(sender, DataGridView) If dgv(5, e.RowIndex).Value IsNot Nothing Then If CInt(dgv(5, e.RowIndex).Value) < 180 Then dgv(5, e.RowIndex).Style.BackColor = Color.Red ElseIf CInt(dgv(5, e.RowIndex).Value) < 210 Then dgv(5, e.RowIndex).Style.BackColor = Color.Yellow Else e.CellStyle.BackColor = Color.White End If End If End If End Sub |
| 下記実行後、セルに Ctrl キーを押しながら 0 キーを入力して見て下さい。 Private Sub Button13_Click(sender As Object, e As EventArgs) Handles Button13.Click '11.セル値が DBNull.Value または Nothing である場合にセルに表示する値を取得または設定 If DataGridView1.Rows.Count = 0 Then Button1.PerformClick() End If DataGridView1.Item(1, 3).Value = Nothing DataGridView1.Item(1, 4).Value = vbNullString DataGridView1.Item(1, 5).Value = String.Empty DataGridView1.Item(1, 6).Value = vbNull Debug.Print(TypeName(DataGridView1.Item(1, 5).Value)) DataGridView1.DefaultCellStyle.NullValue = "空のセルです" MessageBox.Show("セルに Ctrl キーを押しながら 0 キーを入力して見て下さい。") End Sub |
Private frg12 As Boolean Private Sub Button14_Click(sender As Object, e As EventArgs) Handles Button14.Click '12.セル個別にToolTipTextを表示する frg12 = Not frg12 'DataGridView のセルの内容のツールチップテキストを表示しないように設定 'セルの値がセルに表示しきれない場合、デフォルトでツールチップテキストが '表示されるのがうっとおしい場合等にDataGridView の表示設定の前に設定して下さい。 '別途、プロパティからの設定でも OK。 'DataGridView1.ShowCellToolTips = frg12 Button1.PerformClick() DataGridView1.Columns(1).Width = 50 End Sub Private Sub DataGridView1_MouseMove(sender As Object, e As MouseEventArgs) Handles DataGridView1.MouseMove 'セル個別に ToolTipText を表示する Dim pos As System.Windows.Forms.DataGridView.HitTestInfo = DataGridView1.HitTest(e.X, e.Y) If frg12 = True And pos.Type = DataGrid.HitTestType.Cell And pos.RowIndex < DataGridView1.RowCount - 1 Then DataGridView1.Item(pos.ColumnIndex, pos.RowIndex).ToolTipText = _ DataGridView1.Item(pos.ColumnIndex, pos.RowIndex).Value.ToString End If End Sub |
Private Sub Button15_Click(sender As Object, e As EventArgs) Handles Button15.Click '13.複数選択されているセルを取得・表示 If DataGridView1.Rows.Count = 0 Then Button1.PerformClick() End If For Each Cel As DataGridViewCell In DataGridView1.SelectedCells Console.WriteLine(String.Format("ColumnIndex = {0} RowIndex = {1} Value = {2}", _ Cel.ColumnIndex, Cel.RowIndex, Cel.Value)) Next Cel End Sub 上記実行結果(先入れ後出しで保存されるようです。) ColumnIndex = 5 RowIndex = 5 Value = 248 ColumnIndex = 1 RowIndex = 5 Value = 仲居 正弘 ColumnIndex = 5 RowIndex = 2 Value = 263 ColumnIndex = 1 RowIndex = 2 Value = 加藤 愛子 |
Private Sub Button16_Click(sender As Object, e As EventArgs) Handles Button16.Click '14.ユーザーが複数のセルを選択する事が出来るようにする/出来ないようにする If DataGridView1.Rows.Count = 0 Then Button1.PerformClick() End If 'ユーザーが複数のセルを選択する事が出来るようにする 'DataGridView1.MultiSelect = True 'ユーザーが複数のセルを選択する事が出来ないようにする 'DataGridView1.MultiSelect = False DataGridView1.MultiSelect = Not DataGridView1.MultiSelect End Sub |
Private Sub Button17_Click(sender As Object, e As EventArgs) Handles Button17.Click '15.セルにコンテキストメニューを設定する If DataGridView1.Rows.Count = 0 Then Button1.PerformClick() End If '別途、ContextMenuStrip1 コントロールを用意しておいてください 'セル全体に対して設定する場合 DataGridView1.ContextMenuStrip = ContextMenuStrip1 wt.WaitTime(5000) Beep() 'セル全体に対して設定を解除する場合 DataGridView1.ContextMenuStrip = Nothing '1列目にだけ設定する場合 DataGridView1.Columns(0).ContextMenuStrip = ContextMenuStrip1 wt.WaitTime(5000) Beep() '1列目にだけ設定を解除する場合 DataGridView1.Columns(0).ContextMenuStrip = Nothing End Sub |
| データグリッドビュー DataGridView セル |